The agent system BORG is based on an educational language, called Pico.
The system itself supports location transparent routing, strong migration
(at any time can we move an agent, even if it's in the middle of the
execution of code) and a very suitable commuication paradigm.
More information can be found at
http://progwww.vub.ac.be/poolresearch/CBorg/.
PICO is a programming language developed on the Programming
Lab of the VUB. (PROG).
by Prof. Dr. Theo D'Hondt
as a simple programming language for the Science Students.
BORG was developed for research purposes, mainly because other languages did not support strong migration.
This tutorial will explain the basics of BORG, it will not give a total
introduction to PICO. For a tutorial about pico I refer you to the webpage
about pico. The knowledge of pico
is essential to use BORG
You can find the latest BORG executable at the BORG archive at :
ftp://progpc26.vub.ac.be/cborg/
Simple information about the language Pico is available at :
http://pico.vub.ac.be/
More information can be found at :
http://progwww.vub.ac.be/poolresearch/CBorg/.
This tutorial is online at :
http://borg.rave.org/
- EXECUTABLE
Download the BORG executable : ftp://progpc26.vub.ac.be/cborg/
When you start BORG for the first time it should make the config files itself.
Latest Winborg executable - SOURCE
The downloaded BORG source files.
Unzipped/Untar the files.
(Windows systems : CygWin has to be installed )
For further information, there is a section about compiling in the Readme file.
BORG code is written in Pico extended with
some primitive functions to alow communication between agents.
Agents can communicate with each other in 3 ways.
- Remote function call
- Asynchronous send / receive
- Synchronous send / receive
But first a very short guide to Pico.
|
The Pico language is dynamically typed and a variable can contain values of the
following type: numbers, text, tables, functions and references to agents.
Variables can be defined using the ``:''-operator, assignment to a variable
is written down with a ``:=''. (``::'' is used to define constants ) |
|
|
|
This is just like in any other dynamically typed language. Actually the communication
model doesn't need a dynamical typing at all, so the base language might as well be
statically typed. Equivalent to variables, we can define tables and assign values to any cell of the table. |
|
|
| Functions can also be defined using an equivalent intuitive syntax. |
|
|
|
We also need some kind of if-then-else construction. if(condition, then, else) while(condition, expression) until(condition, expression) for(initialization, step, condition, expression) |
|
- Remote function call
- Asynchronous send / receive
- Synchronous send / receive
This is like java RMI.
If we have 2 agents, we can use Remote function calls to allow the agents to communicate with each other.
The idea is to make a reference to the remote agent by calling the agent(String) primitive function.
When both agents have these references, they can call functions from the other agent by writing
REMARK : This was first called remotedict(String), so if agent(String) doesn't work try remotedict
      agentname::agent(String)
agentname->function(Variables...) |
agentname is a reference to the other agent and function is a function defined in the environment of agentname. After the reference has been made, agentname can be used as if it was a local object/agent.
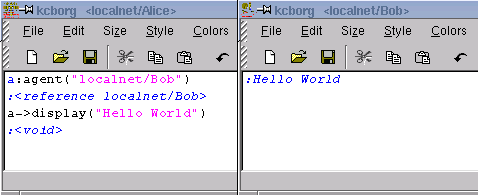 |
| Fig 3.1 Agent localnet/Alice and Agent localnet/Alice1 using agent |
The calls to the remote procedures are done asynchronously. Every result is Void. If you want results to be send back to you you have to use a special technique with callbacks
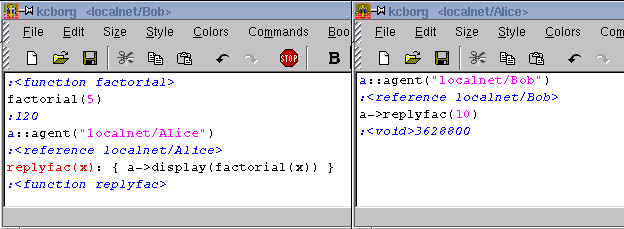 |
| Fig 3.2 Returning results... |
We extend this prototypical language with a pair of communication primitives,
send and receive. Send ensures the asynchronous delivery of a message from one
agent to another. Because the send command is asynchronous, execution of this
instruction results in putting the message in the message delivery system. The
call returns immediately and doesn't wait for the message to actually arrive,
speeding up program execution by avoiding large delays that can be possible in
wide area networks. The downside of asynchronous communication is of course
that errors are difficult to detect.
The two primitive functions used for sending and receiving messages are :
    send(agent, message)
recv(agent, pattern) |
send returns the message,
recv returns the message or <nomesg> if no message was send.
The send instruction needs two parameters to be correctly evaluated, namely the reference to an agent we wish to send the message to, and the message itself.
We can send several messages at the same time, or a message with a variable length to some agent, by sending a table containing all messages. This way tagging can also be done.
Example : send(agent2,["tag","message1"])
The receive command has several means of message-selection built in. First of all, the agent, we wish to receive the message from, can be specified. This can be done by naming the sender explicitly, or by using a wildcard.
If we want to be able to receive a message from a restricted number of agents, we can specify the valid senders in a table. Only messages whose sender appears in the table are returned. If no message from any of these agents is available, nomesg is returned.
Example :
recv(agent1, any) : Receives any message from agent1
recv(any, any) : Receives any message from any agent
recv([agent1, agent2], any) : Receives any message originating from agent1 or agent2
The second argument specifies a pattern the message must conform to. This is enforced by a simple pattern matcher that can compare tables, numbers, text and wildcards. In a language where functions are first class, comparison between two functions cannot be added to the pattern matcher, because of non-local variables. Using the pattern-matcher tagging can be accomplished.
Example :
Recv(any,any) : Receives any kind of message
Recv(any, ["tag", any]) : Receives a table that contains "tag" as it's first element. The second element doesn't matter
 |
| Fig 3.3 Asynchronous sending and receiving (typo: pattren == pattern) (remotedict should be agent) |
To be able to send and receive Synchronously a third primitive was added the
language. It is called sync and synchronizes two or more agents.
| Agent1 | Agent2 |
|
sync(agent2) �. Waiting for sync �. �. Execution continues |
�. �. �. �. sync(agent1) Excecution continues |
The parameters for the sync primitive are equivalent to that of the receive. First of all the other agent we wish to sync with must be specified. Again this can be done by explicitly naming the other agent, using a wildcard, or it could be a table with all possible synchronees. The second optional argument is a pattern, putting restrictions on what agents may synchronize. This way we can choose our synchronee with other means than it's name.
| Agent1 | Agent2 |
|
Sync(any,'tag') ... Continues |
... Sync(any,'tag') Continues |
The synchronous send and receive primitives, can be simulated with sync, send and receive:
       ssend(to,message):
       {
       send(to,message);
       sync(to,message)
} |
       srecv(from,pattern):
       {
       sync(from,pattern);
       recv(from,pattern)
} |
The method of sending is exactly the same as with asynchronous sending. When a message is sent synchronous, the sender waits until the receiver has received the message using the srecv(agent, pattern). This could be usefull if you don't want an agent to continue with his task until a send message was received. The message itself is returned.
REMARK : It is absolutely not advisable to use the recv instead of the srecv function, to receive a ssend message, the other agent will continue to wait forever. (bad things may happen)
Short Review :
agent(String) : creates a reference to an agent at String
send(agent, message) : send a message to an agent asynchonously. Returns the message
ssend(agent, message) : Synchronous version of the send primitive.
recv(agent, pattern) : Receive an asynchronous message. Recv returns or <nomesg> or the message.
srecv(agent, pattern) : Receive a synchronous message
We will start by making a small counter object, and then continue with a Stack-object
   make_counter() ::
     { c:0;
       increment()::{c:=c+1};
       get()::{display(c)};
       clone()
} |
c is a local variable. Note the single colon ':' at the declaration of c and the dubble colons '::' at the declaration of for example get(). This is important to indicate that the 'methods' are constants and that only the variable c is changed.
In the end we clone() the entire object, meaning all items that are not constant are copied.
The functions (called 'methods' when working with objects) are not copied because they are declared as constant.
How do we work with objects ?
c:make_counter() :<dictionary> d:make_counter() :<dictionary> c->increment() :1 c->increment() :2 c->increment() :3 d->get() :0 |
The objects can be called using Remote function calls. |
Now we will explain about Inheritance with these objects.
I will explain this with a stack example. This stack is extendable to a protected stack.
  { Stack(n):
    { T[n]: void;
      super: void;
      t: 0;
      empty()::   t = 0;
      full()::    t = n;
      push(x)::   { T[t:= t+1]:= x; void };
      pop()::     { x: T[t]; t:= t-1; x };
      makeProtected()::  {
        push(x)::  if(full(), error('overflow'), super.push(x));
        pop()::    if(empty(), error('underflow'), super.pop());
        clone() };
      super := clone() };

  S: Stack(10);
  if(S->full(), void, S->push(123));
  if(S->empty(), void, S->pop());
  R: S->makeProtected();
  R->push(1);
R->pop() } |
You see that the notion of Inheritence is not implemented as in normal object oriented languages. This is because Pico is not realy an object oriented language, and thus dirty tricks have to be used to program in an object oriented style.
The normal stack contains a message makeProtected() wich overrides the push(x) and pop() methods. (They are in different scope levels, both methods exist).
The clone() functions returns a self reference.
One of the major reasons the Borg-system was built is because unlike in other
systems (like java RMI) here it is possible to move agents to other agent-systems.
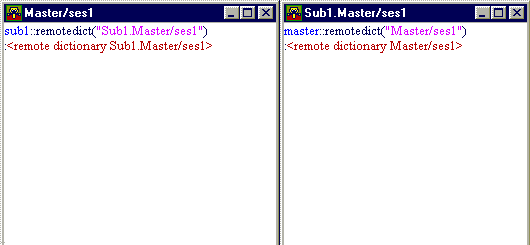
There is a primitive operation where you provide a agent that shall be used as reference to the moved object.
agentmove(agent("Sub.Master")) |
An other way to make an object on a remote computer is the following :
   make_counter() ::
     { c:0;
       increment()::{c:=c+1};
       get()::{display(c)};
       agentclone(clone(),"Sub1.Master/ses3")
} |
This is exactly the same counter-object as written above, the only difference is that this will spawn an instance of the object on the remote agent-system called "Sub1.Master/ses3".
This through the use of agentclone instead of clone.
There is an other tutorial illustrating a small primitive chat-program using c-borg. If you are looking for more information about the language, this might be advisable.
The file borg.localhostname.ini can be found in the config directory.
You can find the latest information about configuring this file at
Borg Frontends
-
You can find the latest BORG executable at the BORG archive at :
ftp://progpc26.vub.ac.be/cborg/
- Simple information about the language Pico is available at :
http://pico.vub.ac.be/
- More information can be found at :
http://progwww.vub.ac.be/poolresearch/CBorg/.
- This tutorial is online at :
http://borg.rave.org/